WeaveMaker User's Manual — Special Menu
Heddles/Harness
This displays a chart showing the number of heddles assigned to each harness. For example, here is the chart for a particular design done on 8 harnesses:

From the chart, you can see that harness #1 has very few heddles in use (2, actually), and harness #2 has fewer heddles than most of the rest. This chart may be useful in helping you decide whether your design could be woven on fewer harnesses. In the example shown here, harness #1 probably could be eliminated without seriously altering the design. Another use for the chart is to help you estimate the lifting weight of each harness.

Repeats
This command brings up a window in which repeats for the weave structure and color arrangement are displayed. As you work on your design, you can refer to this window at any time to see what repeats you have created.

This function is most useful when you have been using a variety of tools to create a design (the marquee, pencil, copy/ paste, insert/delete), and now you want to begin analyzing what it is that you have created.

Float Histogram
This displays a chart showing the float lengths in the design (see illustration below). All four float types are shown simultaneously (the types are: warp floats on the front of the fabric, weft floats on the front, warp floats on the back of the fabric, and weft floats on the back). The length of each black bar is proportional to the number of floats of that length and type. The chart does not tell you where these floats appear in the fabric, simply that they appear somewhere. For a way to directly look at where the floats occur, please see
Float Diagram.

Split Harness
This command helps you redistribute the heddles without altering your fabric design. The heddles which are presently on one harness are rearranged so they are on two harnesses. Splitting a harness adds one harness to the design. The new harness receives half the heddles from the harness you split; the rest stay on the original harness. For example, if you split harness #2 in an 8 harness design, you will then have 9 harnesses. Harness #2 will have half as many harnesses as it did before. The heddles removed from harness #2 are moved to harness #9.

If you do not want the new harness to remain as harness #9, use the Hand tool to do a harness shuffle (please see “Hand Tool” in the Index for details).

Show Fabric in 3-D
This brings up a window (see illustration below) displaying a highly magnified view of the fabric structure and color arrangement, using a very smooth yarn (monofilament, for example). Various levels of magnification are provided.

Only the bottom-left corner of the design is shown.

The intent of the “3-D” view is educational: it is a great way to show people the details of a fabric structure, and it can also help you understand the fabric better.

Fabric Swatch
This controls how the background Fabric window displays a colored example (swatch) of your design.

When you click on this menu entry, it reveals several options:

One Pixel Per Thread
This view shows the color and weave as though the fabric were woven at the same ends and picks per inch as the dots on the screen (roughly, 72 ends/inch and picks/inch). The primary value of this view is that it is created nearly instantaneously on nearly any model of computer. Thus, it is most useful when you are working rapidly and need to get a rough check of your design.

Since it is easy for the computer to create this view, using it does not slow the computer down, and thus your design work is not disrupted by the computer stealing time away to work on creating a rendered image of the fabric.

Weave Simulation
The term “weave simulation” means creating a picture of what a fabric would look like if it were woven, without actually weaving it, taking into account the weave structure, thread colors, thread spacing, and yarn characteristics. The resulting picture can be displayed on the screen or printed out.

WeaveMaker will do a weave simulation using several different types of uniformly dyed yarns of equal size and spacing.

On-Screen Simulation
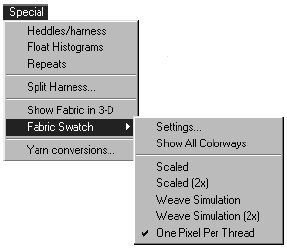
To create a weave simulation on the computer screen, select ”Weave Simulation.”

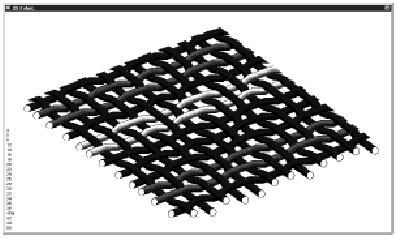
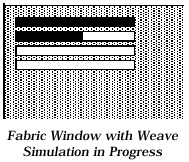
The Fabric window will immediately gray out and several horizontal white bars will appear (see illustration on the right).

These turn black as the weave simulation progresses.

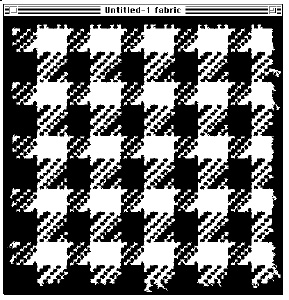
After the weave simulation is complete, the Fabric window fills with the weave simulation picture

As the computer screen is fairly low resolution (70 to 80 DPI), the fabric detail can be difficult to make out. For this reason, you can temporarily double the size of the display by selecting the “Fabric Simulation (2X)” option. It shows the same simulation picture blown up to twice its regular size.

Several styles of yarn are available in the simulation. You cannot, however, design your own yarns, nor scan them in from real life.

The ends per inch and picks per inch settings are taken from those set in the Loom menu. The Settings entry lets you select a yarn type for the simulation. Selecting Settings brings up this window:

The “gassed” yarn is smooth, with few loose fibers. The “fuzzy” yarn, as its name suggests, simulates a quite fuzzy (for example, wool) yarn. The “hairy” yarn is even fuzzier.

When printing a weave simulation, some printers fail to produce convincing black areas (areas of solid black may have a washed-out, gray appearance). If this happens, try using the “Solid Blacks” setting. This reduces the quality of the simulation, but gives more solid blacks.