WeaveMaker User's Manual — Loom Menu

Setting or Querying the Loom Size
The first six items in the Loom menu control the size of the loom (number of harnesses, number of treadles, number of warp ends, number of weft ends, and threads per inch). They also show the current settings of those values.

The example given here deals only with querying and setting the number of treadles, but the same approach is used with any of these items.

Clicking on “Treadles” causes a subsidiary menu of sizes to pop up (illustration below). The checkmark by the

“10” shows the design is sized for that number of treadles. To change the size, release the mouse over the desired size.

If the size isn’t one of the standard ones then it appears in parentheses after “Other….” A loom with 13 treadles would have a checkmark on the last entry, which would read “Other (13)….”

To set a nonstandard size select “Other.” You will be asked to type in the desired number of treadles.

Threads/Picks per Inch
Selecting either “Ends per Inch” or “Picks per Inch” brings up a dialog box (see illustration below) where these values may be entered. Values may be entered to the nearest 1/10 of an inch.

The Design window rulers (please see “Design Window” in the Index for details) are scaled based on the values set for ends per inch and picks per inch. The on-screen rulers are quite accurate.

Stop Motion
If you wish to have portions of the weft beaten more tightly than normal (so-called “stop motion”) you can indicate a second picks per inch value (see illustration below) which indicates the tighter spacing.

To use this alternate value, make sure the stop motion grid is visible in the weft (please see “Stop Motion” in the Views Menu). White squares in the stop motion grid indicate normal weft spacing, while black squares indicate stop-motion and use of the secondary picks per inch value.

Tie-up-Peg Plan Conversion
WeaveMaker will convert a tie-up/ treadling design to a peg plan form, and vice-versa. If you are presently using the tie-up/ treadling form, you will see a checkmark by “Treadling” in the loom menu, or by “Peg Plan” if you are in peg plan mode. To convert from one to the other, select the new form you want in the Loom menu.

It is always possible to convert a tie-up/treadling to a peg plan. However, not all peg plans can be converted to tie-up/treadlings with a reasonable number of treadles. If the peg plan can be converted to a tie-up/treadling that is within the number of treadles you have assigned to the loom, the conversion pro-ceeds without further ado. If not, WeaveMaker deals with the problem by calculating the number of treadles that are required, and then asking you to select one of two options. An example of the type of message it displays appears below.

If you elect to proceed with the existing number of treadles, click the radio button (small circle) conversion. In this example, you would have to edit 250 treadlings in the converted design. You can easily find the omitted treadlings, as they are entirely blank (that is, you would expect in this case to find 250 weft threads which do not have any treadling). If you want to increase the number of treadles in the design (thereby reducing the number of edits necessary), click the second radio button and then click Proceed.

WeaveMaker will not increase the number of treadles beyond 32 in any circumstances, so you may still get a partial conversion if the number of treadles needed exceeds 32.

Of course, you can always click Cancel and abandon the con-version effort altogether. In this case, no change is made to your design.

Tromp as Writ
There are several forms for tromp as writ. All of these derive the treadling from the threading, which is the general meaning for tromp as writ. While tromp as writ is in effect, any changes made to the threading are reflected immediately in the treadling. The treadling is displayed but is grayed out, reminding you that you cannot edit the treadling. Upon entering this mode, any existing treadling is discarded, although you will be first asked for your permission through a message (see illustration below).

Normal
Makes the treadling and thread-ing equivalent for as long as it’s checked.

Tabby
Creates the treadling by interleaving the threading with a tabby on two treadles. The treadling is thus twice as long as the threading and two more treadles than there are harnesses.

For example, the straight draw threading

becomes

in the treadling.

Overshot
Similar to “tabby,” but the threading is modified slightly before being placed into the treadling. For example, “points” in the threading are flattened, shown in the following example.

becomes

Jacquard
Helps you treat a WeaveMaker dobby design as a jacquard weave.

WeaveMaker is designed as a dobby weaving program, not as a jacquard design program. But some of the cornucopia patterns, while beautiful, have such long floats that they will not successfully dobby weave. One solution to this problem is to weave them as jacquards. WeaveMaker’s jacquard mode is provided to help you do this.

This topic is treated at length in the “Jacquard” section (please see “Jacquard” in the Index for details).

Color Tromp
Makes the weft colors and color arrangement a precise copy of the warp colors and color arrangement as long as this item is checked. Any changes made in the warp coloring are instantly reflected in the weft.

This feature makes it easy to create square plaids.

Turn Fabric 90°
Interchanges the threading and treadling and the warp and weft color arrangements, which is equivalent to turning the fabric 90° on a loom.

This option is only available for a tie-up design. In general, a peg plan cannot be used as a threading, which is the reason for this restriction.

Turn Weave 90°
This is similar to Turn Fabric 90°, except that the warp and weft colors and color arrangements are not altered.

Exch Warp-Weft Colors
Interchanges the warp and weft colors and color arrangements.

Back Side
As its name suggests, when this menu item is checked the drawdown shows the reverse side of the fabric. This does not actually reverse the fabric, it merely temporarily reverses the display.

Omit Structure
Checking this menu item cases the drawdown to be displayed as though you were working strictly in plain weave. Whatever threading, tie-up, treadling, or peg plan in place is temporarily ignored.

Use this display setting if you want to see just the effects of your warp and weft color arrangements, without being distracted by how they interact with the structure of the fabric.

Omit Color
Checking this menu item causes the drawdown to be displayed in black and white. This gives the clearest possible view of the structure of the fabric.

Use this display setting when you are doing complicated color-and-weave design and you temporarily want to see just the structure you have created.

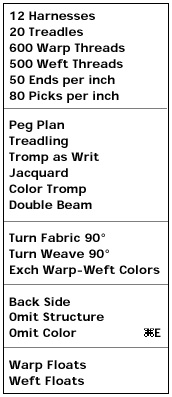
Warp Floats/Weft Floats
WeaveMaker provides several ways to analyze floats. This section discusses how to see all the floats in your fabric at once.

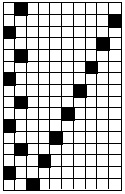
The Warp Floats and Weft Floats commands show you all the floats in the entire fabric, all at one time. By clicking on a particular float that you see in this view, you can immediately shift to the more detailed float view and fix the problem. Indeed, both float modes can quite naturally be active at the same time.

Warp/Weft Floats finds all floats in the fabric and then colors them according to the following system (which you are free to modify to suit your needs):

Float Length Color
up to 3 white
3-4 green
5-7 blue
8 and over red

The illustration below shows how such a display is formed.

Because the float displays use color to show float locations, you may wish to use “Omit Color” (see at left) so your fabric colors do not get mixed into the float display.

Float Controls
You can control both the float lengths which are displayed and the colors used to display them, using the
Tools menu.